
If you’ve been blogging on WordPress for a while, there’s a good chance you’ve looked at your URLs and thought, “I wish I’d set this up differently.”
Maybe your links include dates or categories you don’t use anymore. Or maybe your blog has grown, and now you’re wondering how to update your permalink structure in WordPress without breaking anything.
The tricky part isn’t changing the setting. It’s the fear of hurting SEO, breaking old links, or sending readers to 404 pages.
In this guide, I’ll walk you through how to update your permalink structure safely, when it’s worth changing, and what to do so your current content keeps working the way it should.
- What a permalink is (quick refresher)
- When bloggers usually realize they need to update permalinks
- The best permalink structure for your WordPress blog
- How to update your permalink structure in WordPress
- Does updating your permalink structure impact SEO?
- How to set up redirects after updating your permalinks
- Updating one permalink vs updating your entire permalink structure
- Common permalink mistakes bloggers make
What a permalink is (quick refresher)
A permalink = the permanent URL for a specific post or recipe on your site.
When you publish a post like “Easy 30-Minute Lasagna,” the permalink is the web address people use to find it, share it, and link to it, like:
yourblog.com/easy-30-minute-lasagna
That’s it! It’s the address where your posts, pages, and content live online.
When bloggers usually realize they need to update permalinks
Most bloggers don’t realize their permalink structure is a problem until they’re already deep into publishing.
Food bloggers launched blogs to share family recipes, not thinking about search traffic. Now you’ve got 150+ recipes with URLs like,
/2019/03/grandmas-apple-pie-recipe-just-like-she-used-to-make-it. And you're realizing those extra words and dates are holding you back.
Lifestyle bloggers run into this when evergreen posts still perform well, but date-based URLs make them look outdated, even after multiple updates.
Travel bloggers usually feel it when early destination guides are buried under layers of categories, making URLs long, messy, and harder to rank.
The common thread? You published content before you knew permalink structure mattered, and now your blog is growing faster than its URLs can keep up.
That doesn’t mean you did anything wrong. It just means you’re ready to clean things up safely.
Can you update your permalink structure after publishing posts?
Yes, even if your blog is already full of recipes, travel guides, or posts that bring in traffic every day.
Most WordPress bloggers don’t think about permalink structure when they first start. You’re busy publishing, pinning, updating old posts, and trying to make this whole thing work. Then one day you notice your URLs are long, dated, or cluttered… and the idea of changing them feels terrifying.
You start thinking about everything that could go wrong:
- Pinterest pins that still drive traffic
- Seasonal posts that link to each other
- Recipes people save and come back to
- Affiliate links you rely on for income
You can clean up your permalinks without losing any of that.
Bloggers update their permalink structure safely all the time. What matters isn’t whether you update your permalinks. It’s how you do it, and making sure WordPress knows where everything moved.
Do it the right way, and your blog keeps working exactly like it did before — just with cleaner, more intentional URLs going forward.
The best permalink structure for your WordPress blog
Want the safest, most flexible permalink structure for a WordPress blog? Here it is:
/%postname%/
Just your domain and your post name. No dates. No categories. No clutter. 🙅♀️
So instead of URLs like:
yourblog.com/2022/03/15/recipes/desserts/best-chocolate-cake-everyourblog.com/category/recipes/best-chocolate-cake-everyourblog.com/archives/123
You end up with:
yourblog.com/best-chocolate-cake-ever
Clean. Stable. Easy to work with long-term.
Why this permalink structure works so well for bloggers
- It keeps evergreen content evergreen. Your banana bread recipe doesn’t look outdated just because you published it years ago. Update it anytime without touching the URL.
- It plays nicely with seasonal content. Fall roundups, holiday recipes, summer travel guides — same URL, refreshed every year, no confusion for readers or search engines.
- It won’t break when your site grows. Reorganizing categories later won’t force you to change URLs again. Your content keeps its home, even as your blog changes.
- It creates clean, shareable links. I mean, which one would you rather paste into Pinterest, email, or Instagram?
yourblog.com/easy-strawberry-smoothie
yourblog.com/2021/06/breakfast/drinks/smoothies/easy-strawberry-smoothie
Short URLs win every time.
How to update your permalink structure in WordPress
Updating your permalink structure is pretty easy, and the function lives right in WordPress! I'll show you how to do it below!
1. Go to your permalink settings in WordPress
From your WordPress dashboard, head to:
Settings > Permalinks. You’ll see a list of permalink options with example URLs next to each one.
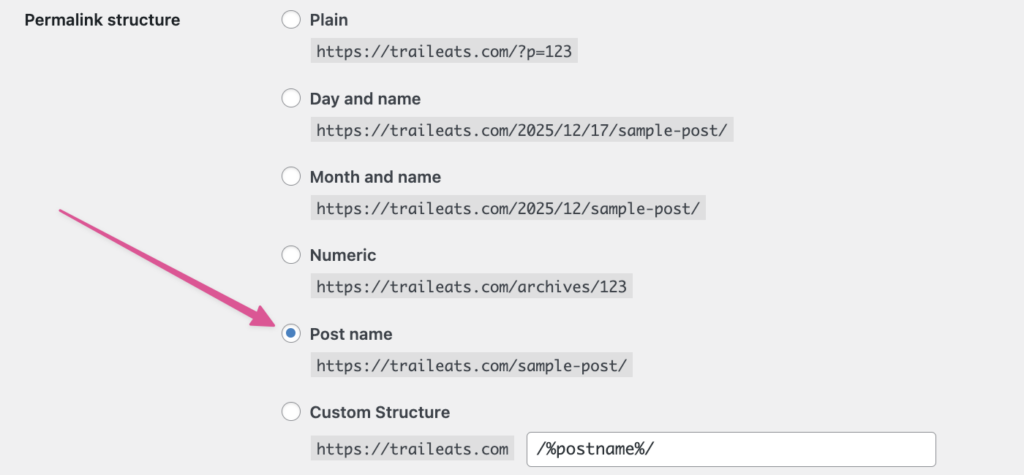
2. Choose a clean structure for your blog's permalinks
For most food, lifestyle, travel, and mom bloggers, the safest and cleanest option is Post name to create short, readable URLs like:
traileats.com/easy-campfire-pizzaInstead of longer, dated versions like:
traileats.com/2022/08/15/recipes/dinner/easy-campfire-pizzaSee how it's the same recipe and same content? But now it has a cleaner, more evergreen URL that doesn’t scream “this was written four years ago.”
3. Save your updated permalink structure changes
After you choose Post name (or confirm /%postname%/), click Save Changes at the bottom of the page.
That’s it. You updated your permalink structure!
Updating your permalink structure doesn't automatically change old posts
Updating your permalink structure…
✅ Affects new posts going forward
❌ Does not change existing URLs
That's on purpose though (and helpful)! Next, I’ll cover how to handle older posts safely so nothing breaks and your internal link optimization is on point.
Does updating your permalink structure impact SEO?
Yes, but only if you skip one critical step.
When you change your permalink structure, all existing links still point to the old URLs.
That includes:
- Google search results
- Pinterest pins
- Links from other blogs
- Internal links across your site
Without redirects, those links lead to 404 errors.
With redirects, everything continues working as normal.
That’s where 301 redirects come in.
A 301 redirect tells browsers and search engines: “This page has permanently moved. Send visitors to the new URL instead.”
When redirects are set up correctly, your SEO stays intact, Pinterest traffic keeps flowing, and readers never hit broken pages!
How to set up redirects after updating your permalinks
One thing to keep in mind here is that WordPress will attempt to automatically create 301 redirects for your blog post URLs, but you'll want to test your old links out to make sure that is the case.
If you need to manually create directs, though, there are plugins for that.
AIOSEO (Recommended)
If you already use AIOSEO as your SEO plugin for WordPress, this is the easiest option. This is what we use to set up redirects for WP Tasty.
The AIOSEO Pro plan has a built-in Redirect Manager that lets you add 301 redirects in a simple form, track broken links, and manage redirects in one place.
To add a redirect:
- Go to AIOSEO → Redirects.
- Paste your old URL in the “Source URL” field.
- Paste your new URL in the “Target URL” field.
- Choose 301 Permanent.
- Add Redirect.

Redirection plugin
The Redirection plugin is another alternative you can use to set up 301 redirects and it gives you some more granular controls. All you have to do is enter the old permalink into the Source URL field and the new one into the Target URL field.

The plugin also keeps track of any 404 errors so you can clean them up whenever they crop up!
Updating one permalink vs updating your entire permalink structure
You don’t always have to redo everything. Sometimes you just need to clean up one URL.
When it makes sense to change a single post URL
Updating one permalink is usually the right move when:
- You’re fixing a typo in a slug (hello, been there!)
- You’re removing a date from an evergreen post
- You’re tightening up a long or awkward URL
I dropped a few easy-to-follow examples down below! 👇
best-camera-for-food-photography-2019 → best-camera-for-food-photography
choclate-chip-cookies → chocolate-chip-cookies
You still need a redirect when you update one permalink.
If a post already has a live URL and you change that URL, you need a redirect.
It doesn’t matter whether the post has Pinterest pins, ranks in Google, or was shared once or a thousand times. If the old URL exists anywhere, a redirect tells WordPress and search engines where that content moved.
That way, old Pinterest pins still work, Google results don’t lead to 404 errors, and internal links stay intact.
Publishing a brand new post? You don't need a redirect. Redirects only come into play when you change the URL of something that already existed.
When to update your entire permalink structure
You’ll usually want to update your whole structure when:
- Most of your URLs include dates or categories
- Your blog has grown and things feel inconsistent
- You want everything to follow a simple
/post-name/format going forward
Remember, this means setting up redirects for your existing posts. But once it’s done, you don’t have to think about it again!
Common permalink mistakes bloggers make
A quick heads-up before you dive in. These are the mistakes that tend to cause stress (and unnecessary traffic drops).
Changing URLs without redirects. This is the big one. Without redirects, old links lead nowhere. And that’s how traffic disappears.
Over-optimizing slugs. Short and clear is great. Too vague isn’t. chocolate-chip-cookies beats cookies.
Repeatedly tweaking URLs. Every change adds another redirect. Too many changes can slow your site and confuse search engines.
Pick a permalink structure you’re happy with, set it up once, and move on!
The final checklist before you update your permalinks
Before you hit “Save,” run through this quick checklist:
✅ Create a full site backup
✅ Be clear on what you’re changing (one post or everything)
✅ Have a redirect plugin ready
✅ Make a short list of your most important posts
✅ Test a few old links after publishing
Updating your permalinks feels intimidating at first, especially if your blog has been around for a while. But WordPress is built to handle this kind of change, and with a little planning, it’s much simpler than it seems.
Once you're done, you’ll have cleaner URLs, fewer future headaches, and one less technical thing to worry about!
