
You’ve probably noticed recipes on Google with star ratings, cooking times, and photos. Or maybe you've seen how-to guides with steps right on the search page.
Those are Google rich results, and they make your content stand out!
But getting them isn’t just luck. 🍀 You need the right setup with rich snippets or schema markup. Then, you can use the Google Rich Results Test to make sure that schema is working the way it should be.
In this guide, I’ll help you understand rich results and show you how to use the Google rich results test. That way, your blog really pops in Google's search results.
Now, let's get to it.
What are rich results?
Google rich results aren't regular search results. They're results that go beyond the basic blue link. They show extra details that catch the eye — like star ratings, images, cooking times, FAQs, and more!
Take a peek at the search engine results page (SERP) when I search for “ooey gooey brownie recipes.” 👀
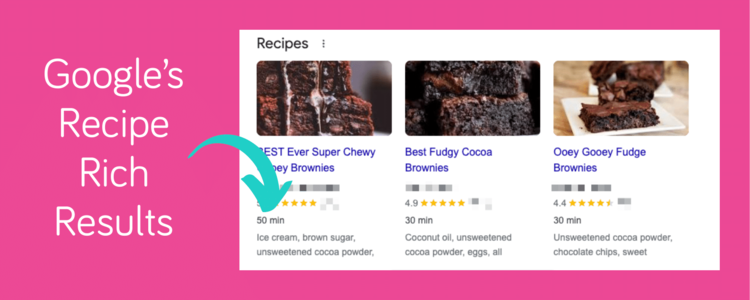
See those delicious recipes at the top? Those are featured recipe snippets, or recipe rich results.
These recipe rich results show:
- ⭐ Star ratings from user reviews
- ⏱️ Estimated cooking time
- 🥗 Ingredients preview
- 📸 A photo of the finished dish
And it’s not just for recipes! Rich results also work for things like:
- How-to guides: Show step-by-step instructions directly on Google.
- FAQs: Let people see answers without clicking through.
- Reviews: Show product ratings and user feedback.
- Product listings: Display prices, reviews, and availability
Google rich results don’t just look nice, though. They can also improve your click-through rate and bring more traffic to your blog.
Now, let me explain how they do that.
Why are Google rich results important for bloggers?
When people see things like star ratings, product prices, or step-by-step guides right on Google, they’re more likely to click.
Why? Because it’s giving them a sneak peek of your post! It shows readers that your content is helpful before they even go to your site. 💻
This is especially important for food bloggers. Imagine showing off your recipe star ratings, cook times, and yummy photos in the search results. You're giving a bite-sized preview that’s hard to resist.
Say someone is searching for a “sugar-free tomato sauce recipe.” They’re more likely to pick the one that lists ingredients (sans sugar!) right in the results.
Rich results also take up more space on the search page, making them easier to spot.
If someone searches for “diy slime,” they'll probably click the result that shows a photo of the slime and a quick list of materials right in the results.

Need extra help with your blog? 👩🏻💻
Sign up for the WP Tasty Newsletter for the latest tips on search engine optimization for beginners and more ways to grow your blog.
How to get Google rich results: add structured data to your site
You need to add structured data to your blog to get Google rich results. But what is structured data, exactly?
It’s a special code that tells Google what’s on your page — whether it’s a recipe, FAQ, or local business info. With this code, Google can show the extra details that make rich results pop!
So, how do you add structured data to your pages? The easiest way is by using schema plugins or a schema markup generator. These tools do most of the heavy lifting for you.
Here are your options for adding structured data to your blog 👇🏻
1. Get a schema plugin for Google rich results.

A WordPress recipe plugin like Tasty Recipes is perfect for food bloggers. It automatically adds structured data code (aka recipe schema) to recipe posts.
Just enter the ingredients, cook time, and other details, and the plugin cooks up the schema code for you.
Not a food blogger? All in One SEO (AIOSEO) has schema markup for many different types of rich results.
AIOSEO's schema settings are also very easy to understand.

You pick the type of schema you want, like articles, FAQs, or events. Fill in the info, and the plugin adds the code automatically.
2. Use a schema markup generator
If you’re not using a plugin, a schema markup generator can help you create the structured data code you need for Google rich results.
You can use a generator like Google’s Structured Data Markup Helper.

You pick the type of rich result you want — like FAQs, product reviews, or business info. Then, you fill in the fields. The generator creates the code for you.
Once you have the code, copy it and paste it into your blog post's HTML.
It’s a bit more hands-on than a plugin, but still easy to do!
3. Code your schema for rich results on Google
It’s more technical, but coding it yourself gives you full control over what Google displays.
If you love the hands-on approach, you can add structured data directly to your post’s HTML.
Decide which type of rich result you want — maybe it’s a recipe, FAQ, or product review.
Once you know, you’ll need to create the schema code using JSON-LD format, which is Google’s preferred style. I highly recommend going to Schema.org for info on your rich snippet type.

💡 Pro Tip: Use Google’s Rich Results Test to make sure your code is correct before hitting “Publish!”
With structured data in place, you’re one step closer to getting rich search results!
How to use Google's rich results test to test your structured data
Now that you have a better idea of what a Google rich result is and why it's important for your site, the next question is: How the heck do I know what structured data is in my post?
And I have good news on that front! All you have to do is put your blog posts into Google's Rich Results Testing Tool to see what structured data is missing from your posts.
Here are the steps to using Google's rich results test on your laptop or desktop
1. Put your URL into Google's Rich Results Test
Head to Google's Rich Results Testing Tool.
Then, paste the URL of your blog post into the box. Hit “Test URL,” and let the tool do its magic! 🪄

Google's rich results test checks the page for structured data and shows two types of results:
- 🚨 Errors: These are marked in red, and mean required fields are missing. Your post won’t get rich results until these are fixed.
- ⚠️ Warnings: These show up in yellow and are just recommendations. Fixing them can improve your results, but they’re not required.
2. Review feedback from Google's Rich Results Test
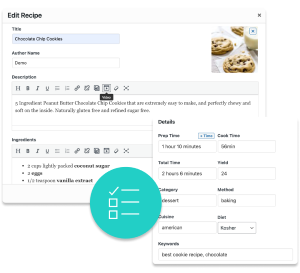
Let's look at a chocolate chip cookie recipe I set up on my demo site. 🍪
In this Google rich results test example, I got an error saying, “Missing field ‘image.'” This means I must add a recipe image to qualify for rich results.

The warnings here show missing details like “nutrition,” “recipeCuisine,” “keywords,” and “prepTime.”

You don’t need these to get a rich result, but adding them makes your content look better in search results and featured snippets.
3. Fix your errors and warnings based on the rich results types
First, I need to add an image of my chocolate chip cookies to clear that error and get rich results.
For richer results, I can add the missing details from the warnings, like the recipe's cuisine, keywords, cook time, and more.
The good news? I can do all of this using Tasty Recipes!

Once that's done, I recommend running the Google Rich Results Test again to make sure everything is ready for those sought-after search query snippets.
Here are the updated results for that same recipe ⬇️

They are now eligible for rich results! 🎉
Now you know how to test for structured data! But remember, this is just one way to fix recipe schema. There are plenty of other rich results to explore, like review snippets, FAQ rich snippets, how-to guides, or even video tutorials.
Each has its own unique requirements for showing up in Google’s special search features.
Bring your blog to life with Google rich results
Interested in trying Tasty Recipes?
With our easy-to-use, customizable recipe card plugin, Tasty Recipes helps you look good — and your recipes look even better.
Take a look at all Tasty Recipes has to offer.
Also, don’t forget about our 14-day money-back guarantee! Trying Tasty Recipes is risk-free!
Adding Google rich results might sound tricky, but it’s one of the best way to help your blog posts shine! Whether it's a yummy recipe, a craft guide, or a review snippet, rich results get more eyes on your content.
The secret? Structured data! Use tools like Tasty Recipes, AIOSEO, or Google’s Structured Data Markup Helper. And don’t forget to test your posts with Google’s Rich Results Test.
Now, go ahead and let your blog sparkle on Google’s search pages! ✨
