
If you’re a WordPress blogger using affiliate links or sponsored content, you’ve probably seen terms like rel=”sponsored” and wondered if you actually need to worry about them.
You do, but not in the scary, overly technical way it’s often explained.
This jargon-free guide breaks down rel=”sponsored”, rel=”nofollow”, and rel=”ugc”, shows you when each one matters, and walks you through how to add them to your links in WordPress without slowing down your workflow.
Let’s make sure your blog stays transparent, SEO-friendly, and compliant. 💻
- What are link attributes (and why should bloggers care)?
- The 3 link attributes every blogger needs to know
- How to add link attributes to links on your WordPress blog
- Your quick-reference link attribute cheat sheet
- How to make link attributes part of your blogging routine
- Common questions bloggers have about link attributes
- Making link attributes easy (and automatic)
What are link attributes (and why should bloggers care)?
Think about your pantry at home. Flour in one container, sugar in another, and salt in a third. You label each one so you don’t accidentally dump salt into your cookie dough. (Because… yikes. 😖)
Link attributes do the same thing for your blog. Paid? Not endorsed? Added by a reader? Link attributes make that clear.
Behind the scenes, a link with an attribute looks something like this:
<a href="https://amazon.com/stand-mixer" rel="sponsored">stand mixer</a>That rel=”sponsored” part? That’s the link attribute.
It’s basically telling Google: “Hey, just so you know, I’m getting paid or compensated for mentioning this.”
Simple, transparent, and totally normal in the blogging world.
Why these little link tags matter for your blog
Using the right link attributes helps you:
- Stay on Google’s good side (always a win for SEO)
- Be clear and honest about brand relationships
- Protect the time and energy you’ve poured into your content
- Build trust with both Google and your readers
And here’s the part that surprises a lot of bloggers…
Google now treats link attributes as “hints,” not hard rules. That means they’re looking at your overall content quality, not obsessing over every single tag.
But using the correct link attributes still matters. Especially when affiliate programs and sponsored partners expect you to follow their rules. They’re a key part of transparency, professionalism, and keeping your blog squeaky clean (without stressing yourself out).
The 3 link attributes every blogger needs to know
Let's break down each link attribute Google checks for with examples you'll actually use in your day-to-day blogging life!
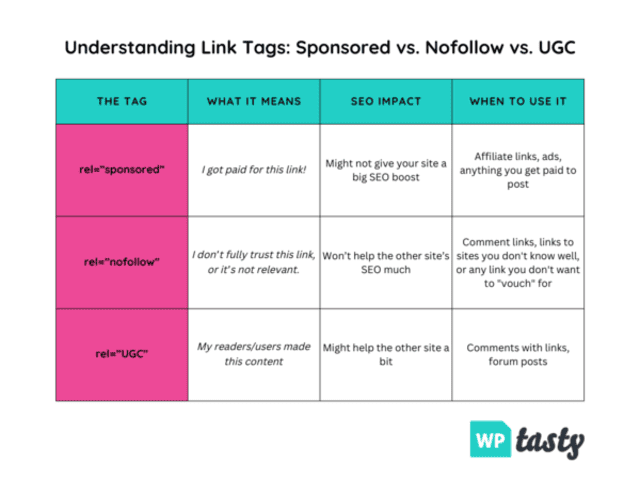
1. rel=”sponsored” (When money or free stuff is involved)
When to use it: Any time there’s money, commission, or free products involved.
This means you need to add it to:
- Your Amazon affiliate links (or any affiliate links!)
- Links in sponsored posts
- Links to products you got for free
- Any paid partnerships or compensated content
Example in your content: “Olive oil” in your recipe card ingredients links to Amazon, so it needs the rel=”sponsored” attribute.

What it looks like in HTML (just for reference — you usually won’t touch this):
<a href="https://amazon.com/olive-oil" rel="sponsored">olive oil</a>
🚨 Common mistake alert! The #1 thing bloggers forget? Tagging those affiliate links! It's easy to forget when you're focused on creating amazing content, but it's super important for staying compliant.
2. rel=”nofollow” (When you're not fully backing a site)
When to use it: For links where you're not necessarily endorsing the destination or don't fully trust it.
This is perfect for:
- Links to sites you're mentioning but not personally recommending
- Resources that might be helpful but you haven't fully vetted
- Links in controversial discussions or where you're presenting multiple viewpoints
- Any link where you want to say “I'm linking to this, but not necessarily endorsing it”
What it looks like in HTML:
<a href="https://example.com" rel="nofollow">this interesting perspective</a>
Think of nofollow as a polite boundary. You’re linking for your readers, but not giving the site your full stamp of approval.
3. rel=”ugc” (For content your readers create)
When to use it: Any content your wonderful readers create on your site.

This tells Google, “I didn't write this part. My community did!”
It's especially important for:
- Links in your blog comments section
- Forum posts if you have a community area
- User submissions or guest posts where people can add their own links
What it looks like in HTML:
<a href="https://usersite.com" rel="ugc">Jane's favorite recipe site</a>
In most cases, your theme or comment system adds this automatically. But it’s good to know what it’s doing.
How to add link attributes to links on your WordPress blog
Once you know which link attributes to use, adding them is pretty simple. There are two ways to do it:
- The hands-off way (with a WordPress link plugin).
- The hands-on way (copy, paste, adjust the link settings every single time).
The quick and easy way to add link attributes (like rel=”sponsored”)
Have a blog on WordPress? This is where tools like Tasty Links come in handy, especially when it comes to automatic linking and automatic link tagging.
Instead of adding affiliate links and link attributes manually every time, Tasty Links works like this:
- Add your keyword.
- Paste in your link.
- Toggle the link settings you want (like rel=”sponsored”, nofollow, or a disclosure).
- Hit save.
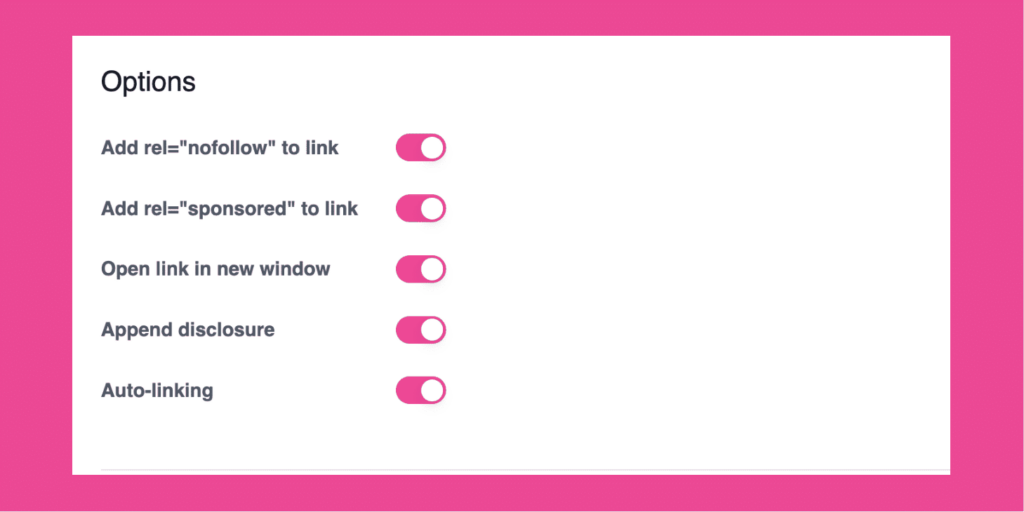
From then on, any time you use that keyword/phrase, Tasty Links automatically pulls in:
- Your affiliate link
- The correct link attributes
- Your disclosure (if you want one)
No copy-pasting. No forgotten tags. No second-guessing.
It’s especially helpful for affiliate links, because it keeps everything clear and consistent without interrupting your writing flow or slowing you down.
The manual way to add link attributes (like rel=”sponsored”)
Want to add link attributes yourself or just need to tag a one-off link (like a stat, reference, or source)? Here's how to do it in WordPress. ⬇️
- Highlight the text you want to use as your link.
- Paste in your URL.
- Click the link to open link settings.
- Toggle the options you need.

Your quick-reference link attribute cheat sheet
Bookmark this. Screenshot it. Come back whenever your brain goes, “Wait… which one was it again?”
| Link Attribute | When to Use It | Common Examples |
|---|---|---|
| rel=”sponsored” | Any time money, commissions, or free products are involved | Affiliate links, sponsored posts, gifted products |
| rel=”nofollow” | When you’re linking without fully endorsing the source | Unvetted resources, neutral references |
| rel=”ugc” | Links added by readers | Blog comments, forums |
How to make link attributes part of your blogging routine
You don’t need to obsess over link attributes. You just need a simple system.
Here’s an easy one to keep up with:
- Audit your top posts first. Start with your highest-traffic posts and make sure affiliate links are marked as sponsored.
- Check your comments setup. Most WordPress themes automatically apply
rel="ugc"to comment links, but it’s worth double-checking. - Pick a workflow and stick with it. Tag links manually as you add them, or use a tool that handles link attributes for you in the background.
Once this becomes part of your process, it’s just another small step — like adding alt text or writing a meta description.
Common questions bloggers have about link attributes
- What happens if I forget to add attributes to an affiliate link?
-
Forgetting a tag once won’t tank your SEO, but repeatedly skipping link attributes can put your affiliate accounts at risk. Most programs require proper link labeling and disclosure, and missing those rules can cost you commissions or get an account shut down.
- Can I use more than one attribute on a link?
-
Yes! You can combine them if needed, like rel=”sponsored” and rel=”nofollow”
- Do I need to update all my old posts right now?
-
Nope. Start with your most popular posts and work backward when you have time. Slow and steady progress is better than a stressful panic when it comes to this stuff.
- Will using these link attributes hurt my SEO?
-
Not at all! Using them correctly actually helps because it shows Google you're transparent and trustworthy!
- Do WordPress links automatically add these attributes?
-
WordPress often adds rel=”ugc” to comment links, but affiliate and sponsored links usually need to be added manually or with a plugin.
Making link attributes easy (and automatic)
Link attributes aren’t scary, technical SEO monsters. They’re just small signals that help keep your blog honest, professional, and Google-friendly.
Once you know:
- sponsored = paid or gifted
- ugc = added by a reader
- nofollow = linking without endorsing
…you’re already doing it right.
If you want to make this even easier, grab Tasty Links to automatically apply the right link attributes to your affiliate links. That way, everything’s handled correctly while you focus on publishing.
And honestly? That’s the whole point.
