
Your readers trust you deeply. When you recommend a pan, a planner, a glue gun, or a camera lens, they listen. But if you’re sending them to products you genuinely love without earning anything in return, you’re quietly leaving money on the table.
Affiliate links fix that. They let you earn a small commission when someone buys through your link at no extra cost to your reader.
This guide walks you through how to use affiliate links naturally, ethically, and in a way that fits right into the content you’re already creating. By the end, you’ll understand:
- What affiliate links are and how they work
- How to get affiliate links for your blog
- Common types of affiliate links bloggers use
- Where to use affiliate links on your blog (with examples)
- Rules around affiliate links: disclosures, trust, and SEO
- How to get your affiliate links on WordPress faster
- Your game plan to getting started with affiliate links today
What affiliate links are and how they work
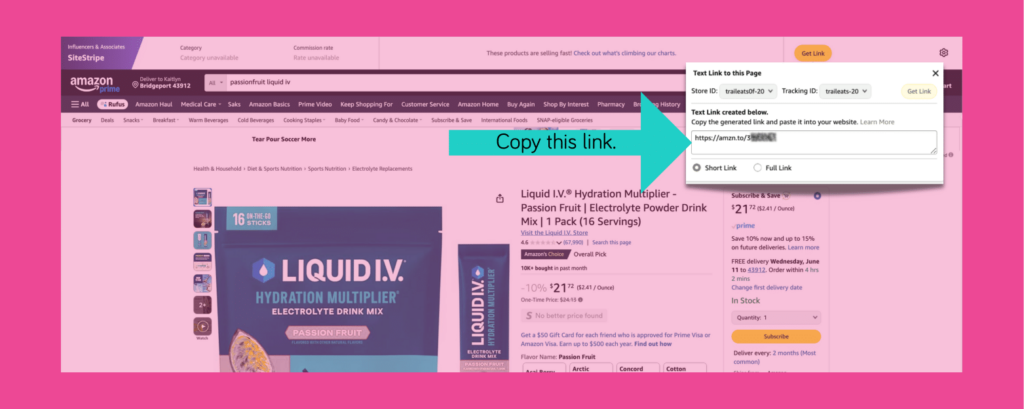
An affiliate link is basically a regular link with a little bit of tracking added.
It’s like adding your blogger business card to a product recommendation. When a reader clicks, the store knows you sent them there. The image below shows exactly what that looks like. ⬇️

In real life, the process is simple:
- You mention a product you truly use or love
- You insert your affiliate link instead of a plain link
- Your reader clicks → shops normally
- If they buy, you receive a commission
- They pay the same price they would’ve anyway
Next, I'll explain how the whole affiliate link process works from signup to getting paid.
How to get affiliate links for your blog
If you want to share affiliate links, they need to come from somewhere. So, here's the step-by-step on how to get them.
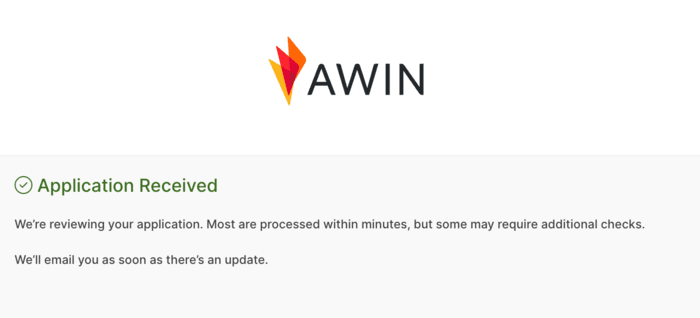
1. Join an affiliate program: Start with brands and shops you already use and love. Big networks like Amazon, Awin, or Impact are popular starting points, but almost every niche has great options.
Already a WP Tasty user? Apply to our affiliate program today!
2. Get your unique affiliate link. Once you’re in, you’ll see special tracking links tied to your account. Those are the links you’ll share with your readers.
3. Add affiliate links naturally to your content. Sprinkle them into your blog posts where they make sense.
Recipe ingredient and equipment lists, tutorial supply sections, or “my favorite tools” mentions are a few places.

4. Reader clicks your link. When someone clicks, a small tracking cookie goes on their device.
5. Reader makes a purchase. If they buy within the “cookie window” (more on that in a sec!), you get credit for the sale, even if they buy different items than what you linked to.
6. You earn a commission. The company pays you a percentage of the sale. You'll see the commission in your affiliate dashboard, but never names, addresses, or personal details.
What's an affiliate cookie window?
A cookie window is just fancy talk for “how long you get credit for sending that customer.“
For example: Amazon has a 24-hour cookie window. If someone clicks your link for a spatula but ends up buying a TV within 24 hours, you still earn commission on that TV! Other programs might give you 7, 30, or even 90 days of credit.
It's your recommendation's shelf life before it expires. The longer the window, the better for you.
Common types of affiliate links bloggers use
There are a few simple ways to weave affiliate links into your content. The most common (and easiest) place to start is with text affiliate links.
1. Text affiliate links
These are regular words in your post that link to products. They work perfectly for things like:
- Mentioning your favorite pan in a recipe post
- Linking to craft supplies in a DIY tutorial
- Recommending a camera, planner, or a tool that saved you time
2. Affiliate links in button/CTA links
These are clickable buttons in your post that lead to a product or a shop page. They stand out more than a regular text link and work well when a reader is already interested and just needs a nudge.
They’re great for things like “Shop my favorite baking tools” or “Get the supplies I used for this project.”
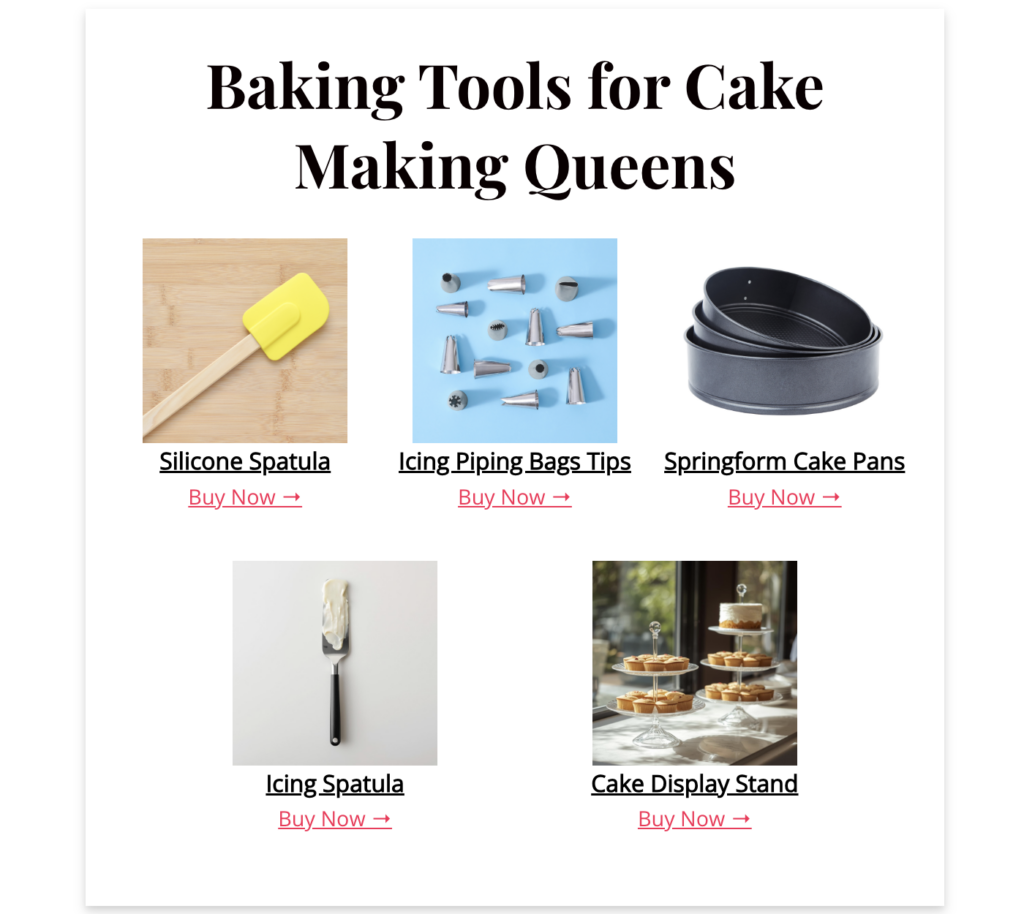
3. Image affiliate links and product galleries
Image links are photos that act like links. When a reader clicks the picture, they go straight to the product page.
When you group several of these images in a grid (like the “Baking Tools for Cake Making Queens” example below), you get a simple product gallery your readers can quickly shop.
5. Product comparison tables
Product comparison tables line up similar items side by side so readers can quickly see the differences and pick what fits them best.
This is super helpful when comparing budget vs. splurge options or a few versions of the same tool with different features.
Where to use affiliate links on your blog (with examples)
Now let's go over where to put your affiliate links for maximum helpfulness and earnings.
The secret is making them feel like a natural extension of your content.
6 Easy places to use affiliate links:
1. Recipe and how‑to posts: These are goldmines for product recommendations, especially for food or DIY bloggers.

You might say, “This [pizza stone] gives the crust that bakery‑style crisp,” and link it right in the equipment section of your Tasty Recipes recipe card so readers can easily find it.
For more related ideas, hop over to my guide to affiliate links in recipes.
2. DIY and tutorial posts: Step‑by‑step tutorials are perfect for linking the exact supplies readers need, like, “This [cordless glue gun] lets me craft anywhere. No more tangled cords!”
3. Favorite tools and resource pages: Readers expect recommendations here, so pages like “Craft room essentials” or “Travel must‑haves for families” are a natural place to round up your go‑to products with affiliate links.
4. Gift guides and seasonal roundups: Curated collections like holiday gift guides are made for affiliate links, whether it’s “Camping gear we actually use with kids” or “My favorite holiday baking tools.”
5. Newsletters and email sequences: Try tucking affiliate links into helpful emails. Add a short note that some links are affiliate, so everything stays transparent.
6. Social media posts and stories: Share affiliate links on platforms that allow them. Have a favorite tripod? Create an Instagram reel or story about shooting photos, with a brief “#ad” or “#affiliatelink” disclosure in the caption.
💡 Remember, your affiliate links should feel like helpful tips from a friend who's been there, done that — not random product placements.
Rules around affiliate links: disclosures, trust, and SEO
Affiliate links work best when they’re honest, clearly disclosed, and wrapped in content that truly helps your readers.
Affiliate link disclosures
You MUST let readers know when you use affiliate links. But don't worry, it's super simple to do it right.
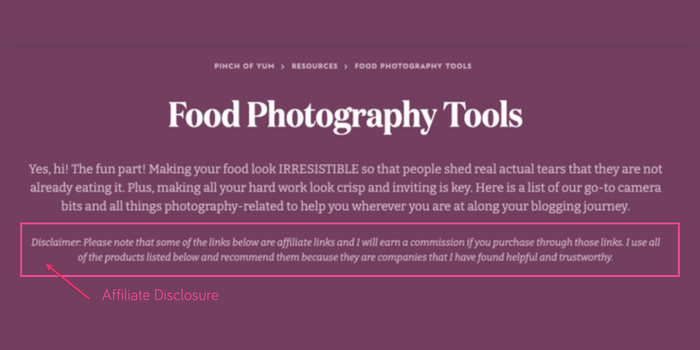
Good spots for a short disclosure:
- Top of posts
- Before product sections
- Inside your footer (as a backup)
If you’re not sure what to say, our guide to affiliate disclosures for bloggers has simple, copy‑and‑tweak examples.
Building and maintaining reader trust while using affiliate links
Your readers appreciate thoughtful affiliate recommendations when they trust you. So, here's what to do to keep that trust.
⭐️ Affiliate Link Do's:
- Recommend products you actually use and trust
- Share honest pros and cons, not just hype
- Explain why you like something and how you use it
- Be clear about your affiliate relationships
🚫 Affiliate Link Don'ts:
- Link to things only because they pay high commissions
- Hide or bury your disclosures
- Copy manufacturer descriptions word‑for‑word
- Recommend anything you wouldn’t buy yourself
A great example of “helpful first, affiliate second” is Meryl from Sungrown Kitchen.
In this feature about her Tasty Links–powered shop page, you’ll see how she treats it like a resource library for her readers, and the affiliate links are simply how she earns from the tools she already loves.
Do affiliate links hurt SEO?
Affiliate links won’t hurt your SEO if you use them the right way.
- Use proper link attributes (like
rel="sponsored"orrel="nofollow") - Focus on helpful, people‑first content
- Avoid stuffing posts with links
- Focus on helpful, people‑first content that answers real questions.
Search engines care most about whether your content helps readers, not whether you earn from it.
For more ideas on sharing links in a natural way, peek at my guide on how to promote affiliate links.
How to get your affiliate links on WordPress faster
Manually adding affiliate links is… a lot. Copying and pasting til your fingers cramp? No thanks.
Our WordPress affiliate plugin makes it much lighter. You keep all your affiliate URLs in one place, tell it which words to link, and it quietly adds those links across your site. When a product URL changes, you update it once, and it updates everywhere.
Say you have your favorite Dutch oven in 25 posts. Then, the brand changes the link. Without a plugin, you’re fixing 25 posts by hand. With Tasty Links, you update one link in your dashboard, and you’re done.

Your game plan to getting started with affiliate links today
| When | What to do | Focus |
|---|---|---|
| Today | Join 1–2 affiliate programs for brands you already love. | Get approved and ready to link. |
| Pick 3–5 products you truly recommend and add a clear disclosure to one post. | Start with products you actually use. | |
| This week | Add helpful affiliate links to 1–2 of your highest‑traffic posts and start a simple tracker (note or sheet) with each product, program, and link. | Make your most‑read posts work harder for you. |
| This month | Once a month, check clicks and earnings, fix broken or outdated links, and add links to new posts. | Keep everything fresh, working, and trustworthy. |
Where to go from here with affiliate links
Affiliate links are the answers to all those DMs you already get asking: “What pan is that?” “Which glue gun do you use?” “Where did you get that planner?”
You’re just turning those answers into links that quietly support your blog while still being genuinely helpful.
Start with one product, one program, and one well‑loved post. When that feels good, you can build from there, and let tools like Tasty Links handle the repetitive parts in the background.
