Knowing how to connect Pinterest to WordPress transforms how you connect with your audience.
WordPress and Pinterest each have over 400 million users. So, having their audiences involved means tons of eyes on your content. By connecting these platforms, you add a visual pop to your blog posts with Pinterest pins. And you tap into more analytics!
But if you're unsure how to add Pinterest to your blog, don't worry. Our guide shows you exactly how to add Pinterest to your WordPress site.
We'll start by getting your Pinterest up and running and connected to your WordPress site. Then, we'll get into the features Pinterest has to improve your blog. From embedding eye-catching pins to using Pinterest analytics for deeper insights, we'll cover it all.
Ready to add some Pinterest charm to your blog? Let's get started!
Why connect Pinterest to WordPress?
Connecting a social media platform like Pinterest to WordPress is a smooth move for bloggers who want more engagement and further reach.
And isn't that the goal? Mixing your wise words on WordPress and pretty pictures from Pinterest uses the best of both platforms to make your site aesthetic, connected, and insightful.
Here's how:
- Reach more people: More people seeing your content means more potential for them to share it. And who knows? Maybe you'll get more saves on your pins, too!
- Photos that go somewhere: Each pin is a visual that takes readers deeper into your blog posts.
- Search engine optimization: Using Pinterest helps your blog rank higher on Google. It's a boost for your blog to be seen by more people.
- Ways to learn: Pinterest gives you stats on each pin. That way, you know exactly what pins your readers can't get enough of!
For websites that really rely on photos, like food, fashion, or crafts, using Pinterest for blogging is a smart choice. It shines a light on your visual content. That way, it gets the attention it deserves.
So, if you're ready to link your blog with Pinterest, follow these steps!
- Sign into Pinterest or change to a business account
- Verifying your website on Pinterest
- Add your Pinterest content to your blog
1. Sign into Pinterest or change to a business account
First, log in to your Pinterest account or get a Pinterest business account.
If you don't have one, it's super easy to sign up or convert to one. Having a business account lets you see how many people like your pins and more!

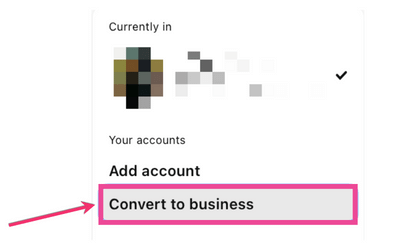
Here’s how to convert to a business account:
- Click on your profile picture in the corner.
- Choose Settings and then Account Settings.
- Look for Convert to a business account and click it.

Next, Pinterest will ask you some questions about your account and your marketing intentions.

You've survived that part, right? Now, head to your WordPress site to double-check your authorized user settings. This is to make sure you're allowed to make the upcoming changes!
2. Verifying your website on Pinterest
You need to claim Pinterest on your WordPress site. That means letting Pinterest know that your website is yours.
After you do this, you get cool tools like analytics to see how well your pins are doing. So, here’s how to claim your WordPress website on Pinterest.
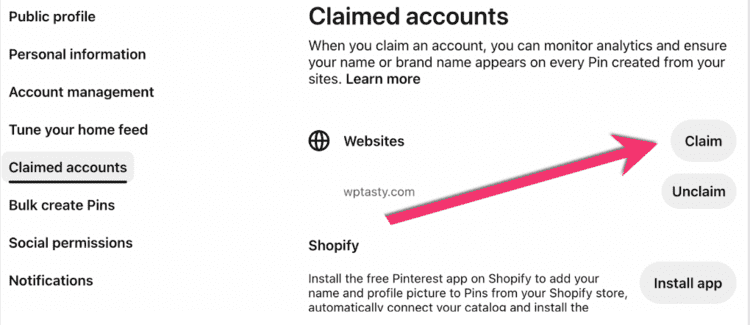
First, go to your Profile photo → Settings in the drop-down menu.

From the settings page, click Claimed accounts → Claim. This is where you add and claim your website.

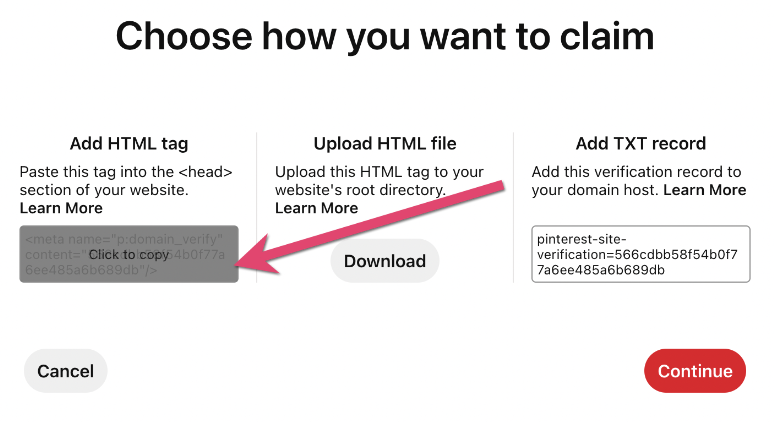
Now, it's time to verify your site. You'll get a pop-up with a few different options. We recommend copying the HTML tag on the left side of the window.

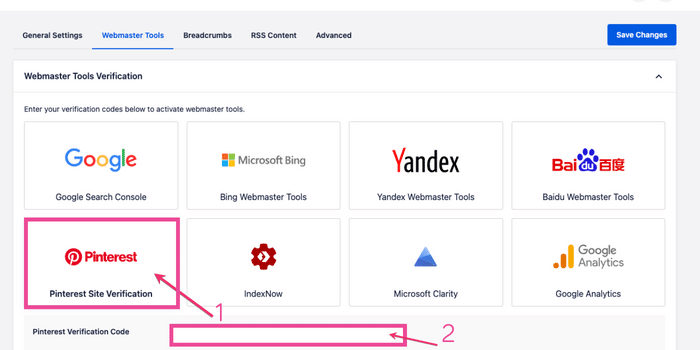
From here, you have a few options. We recommend using a plugin like AIOSEO, which you'll see in the image below. In WordPress, go to your All in One SEO plugin → General Settings → Pinterest Site Verification.

Add your HTML tag (Pinterest meta tag) that you copied earlier! And lastly, click on the save changes button in the upper right-hand corner.
Now you can go back to Pinterest and click Continue on the Choose how you want to claim pop-up.

After that, add your site URL to the box and click to Verify your WordPress site. In about 24-72 hours, you'll be set to put your pins into your content!
Keep an eye on your inbox because they'll email you when your site is verified.
3. Add your Pinterest content to your blog
Now that Pinterest and WordPress are connected, your blog is ready to spotlight the best of Pinterest, from individual pins to whole boards and profiles.
First, we'll go over embedding these elements directly onto your site and then how to use the best WordPress Pinterest plugins to make this connection as easy as possible.
So, let's start with adding boards, pins, and profiles to your site.
Embed Pinterest boards, pins, and profiles
Pick whatever Pinterest element you want to show off — pins, boards, or your profile. Here's how to add these to your WordPress blog posts:
Thanks to the Pinterest block for WordPress, this is pretty simple. Whether it's a pin, board, or profile, the first step is the same. Click + to add a Pinterest block.

Then, add the URL to whatever you want to share in the post!

Here's what it looks like when it's embedded!
Now, there is a downside to this way. You don't have any control over the size.
If you want to control the size, it does involve a little extra on your end. Go to the specific pin you want to share and click the three dots for more options.
Then click Get Pin embed code. From here, you can choose the size that works best. The options are small, medium, large, and extra large.

Copy that code and go back to your WordPress dashboard. Then, go to the post you're adding it to. Click the + again, but this time you'll click Custom HTML. Then, paste the HTML in the block.

We've also added an example below of what the small pin HTML code will appear on your blog. It even has the Pinterest tag for saving in the top right corner.
Get plugins that are a perfect match
Now…you could go through all of these steps. Or, you could lighten your load with our plugin.
You still need to connect your site and Pinterest, but Tasty Pins can do a lot of the extra work. There's no fumbling around with code or Pinterest widgets. Plus, you get more customization options with us!
Here's what's easier with the Tasty Pins WordPress Pinterest plugin:
- Pin descriptions: Tasty Pins lets you create specific SEO-friendly descriptions for each image. It's key for helping your pins get found.
- Pinterest buttons: These user-friendly sharing buttons allow visitors to repin your content effortlessly, boosting its visibility.
- Pinterest follow box: That's right, a built-in call-to-action! This box nudges blog visitors to follow you on Pinterest.
Plus, with Tasty Pins, control where to add the Pin button on image hover. This gives you more flexibility in showing your content to the world.
And, for food bloggers, there's more than just Tasty Pins! When you pair Tasty Pins with Tasty Recipes, you take your content to the next level. Tasty Recipes makes your delicious recipes look better. And it's optimized for search engines and Pinterest, which enhances their accessibility and yum factor.
By combining Tasty Pins with a WordPress recipe plugin, your WordPress site is ready to tempt visitors to share and save your content. Not to mention the fellow Pinterest enthusiasts you'll attract!
Need assistance with installing and activating the plugin? Our team is here to guide you through every step!
Which pins will you share on your WordPress site?
So, whether or not you put Tasty Pins at your side, this guide has you ready to connect Pinterest to your WordPress website. Here's what to do next — create Pins on Pinterest that link back to your WordPress site.
And to really take things to the next level: Tasty Pins is the answer.
It's straightforward, effective, and just what you need for a Pinterest-primed site. So, grab Tasty Pins, pick your favorite pins, and start sharing them on your blog today. Your journey to a better-looking, user-friendly blog begins here!


