Learning how to use Pinterest for blogging is something all bloggers should be doing.
Here's why: Pinterest is a visual search engine where millions of people look for ideas and inspiration every day. So, it's a perfect way to get your content in front of a whole new audience and get more people to click through to your blog.
And the best part? Pinterest is perfect for bloggers of all levels, even if you're just starting.
So let's jump in and explore the exciting world of how to use Pinterest for blogging!
Why Pinterest is still worth it for bloggers
Basically, Pinterest is a place where you can pin (aka — save) ideas, blogs, products, and images you love and want to revisit later.
And since Google's update last year, more people have turned to Pinterest as a traffic source.
Need more info on why exactly? Watch our YouTube video with all the details! 🎥
Overall, here's why you should use Pinterest for blogging. Pinterest:
- Drives traffic to your blog: People go to Pinterest for new ideas and inspiration. Your pins can bring lots of new readers to your blog. Often more than other social media sites!
- Is easy to use: Learning to use Pinterest for blogging is easy. You don't have to be a tech expert to create beautiful Pinterest images and find your target audience.
- Is ideal for evergreen content: Social media posts quickly disappear, but your Pinterest pins can keep bringing people to your blog for months!
- Builds your community: Pinterest is full of people who love the same things you do. Connect with other bloggers and readers who share your interests.
Now that you know why using Pinterest for a blog is important. Let me walk you through how to use Pinterest for blogging.
How to use Pinterest for blogging
- Set up a Pinterest business account
- Get your Pinterest profile ready
- Create and organize your Pinterest boards
- Make Pins for your blog content
- Turn your blog images into pins
- Take advantage of Pinterest analytics for your blog's success
- Try out the best resources and tools for growing your blog with Pinterest
1. Set up a Pinterest business account
Is your blog up and running? Great. Now, you need a Pinterest account.
You'll want to create or switch to a Pinterest business account.

With a Pinterest business account, you get access to Pinterest Analytics, Rich Pins, ads, and other helpful tools to grow your blog.
To set up a Pinterest business account:
- Go to Pinterest.
- Click “Sign Up.”
- Fill in all the details — your email, password, birthdate, profile name, website (your blog), and business type.
- Answer some basic questions about your business.
- Follow the steps to finish setting up your account.
Pretty easy, right? Now, you're ready to prep your Pinterest profile and connect your blog to Pinterest!
Discover Our Top 5 Tips for Optimizing your Pinterest Account
Sign Up2. Get your Pinterest profile ready
Next, you need to optimize your Pinterest profile for your blog.
So first, pick a profile picture. Use a logo or a professional headshot. This should be consistent with your blog branding. As you can see, I used WP Tasty's logo for its Pinterest profile picture.
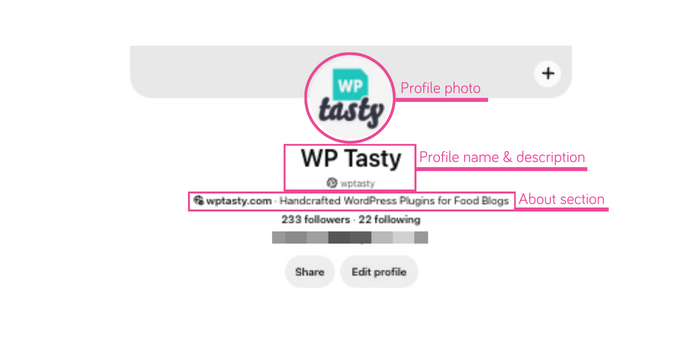
Then, fill out your profile name and write a catchy and concise description of your blog. Make sure to include relevant keywords. This will improve your Pinterest SEO and help people find you.
Last, claim your website. This proves that your site is yours and adds a little more trustworthiness to your profile.
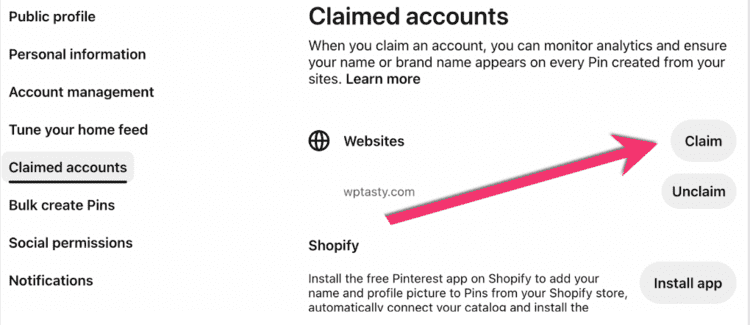
Need help? Check out my guide on how to connect Pinterest to WordPress.
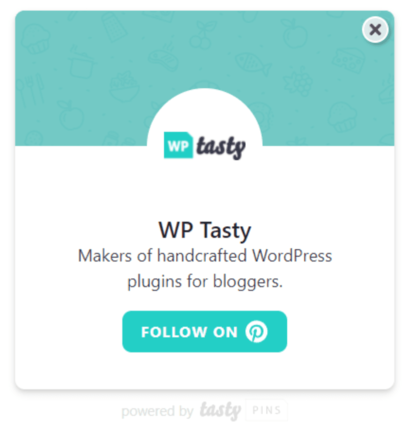
Here's another useful tip: I use a WordPress Pinterest plugin (Tasty Pins) to automatically add a Pinterest follow box to my site. This makes it super easy for your readers to connect with you on Pinterest and see all your pins!
3. Create and organize your Pinterest boards
Boards are where you save your Pins.
So, create boards relevant to your blog's content. There are a few of WP Tasty's Pinterest boards below. There are Pinterest boards covering the plugins, blogging and SEO tips, affiliate marketing tips, and more!

Now, how exactly do you create and optimize these Pinterest boards?
Creating Pinterest boards
Here's a step-by-step guide for creating stand-out Pinterest boards:
- Go to your profile on Pinterest, then click Saved to show your boards.
- Click the + icon and click Board.
- Give your board a catchy, relevant name. Think about your blog's niche and include keywords that fit the topic.
- Choose what Pins to add to the board to start.
- Click the three dots for the settings and choose Edit Board.
- Add a detailed description with related keywords. This tells people about your board and helps Pinterest's search algorithm understand your boards.
- Add a captivating cover photo to draw people in. Make sure it's high-quality and relevant to the board's theme.
Optimizing your Pinterest Boards
Creating a board is half the battle.
But optimizing your boards is also a key part of learning how to use Pinterest for blogging success. Follow the tips below for optimizing your Pinterest boards. 👇🏻
- Keep your boards fresh: Add new pins regularly to show Pinterest (and your audience) that your board is active and relevant. Aim to pin a few times a week.
- Organize with sections: Break down your boards into smaller sections to make it easier for people to find what they're looking for. For example, a “DIY Projects” board could have sections for “Home Decor” or “Crafts.”
- Make your boards public: Make sure anyone can find and follow your boards. This will help you reach a wider audience and grow your brand.
- Use keywords naturally in your board descriptions: Just like I did in the Pinterest Tips board below! That way, Pinterest knows what your board is about and shows it to the right people.

These simple steps can really improve your Pinterest SEO, helping your boards and pins show up in search results and bring more eyes to your content.
4. Make Pins for your blog content
Now, let's talk about Pins.
Pins are the heart of Pinterest. Your Pins are what link to that oh-so-valuable blog content. So, let me explain how to create high-quality Pins that catch attention and drive clicks to your site.
- Click the Pinterest menu in the top left of Pinterest.
- Hit Create Pin.
- Upload a high-quality pin image or create a graphic using Pinterest's tools.
- Write a title and description. Use those keywords your audience is searching for, and don't be afraid to get creative!
- Link back to your blog post. This is how you get those Pinterest peeps to your website!
Optimize your Pins
Optimizing your pins is all about making them easy for people to find and irresistible to click.
But how do you do that?
I've hit on keywords and their importance in your Pinterest profile and boards. The same goes for your Pin titles and descriptions! Use keywords in your Pinterest titles, descriptions, alt text, and image overlay text.
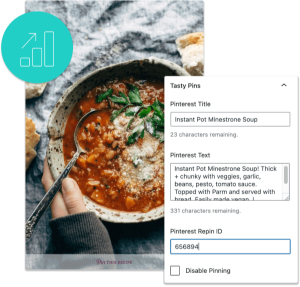
And you know what's awesome? With Tasty Pins, you can add your Pin titles, descriptions, and repin IDs straight from your WordPress editor.
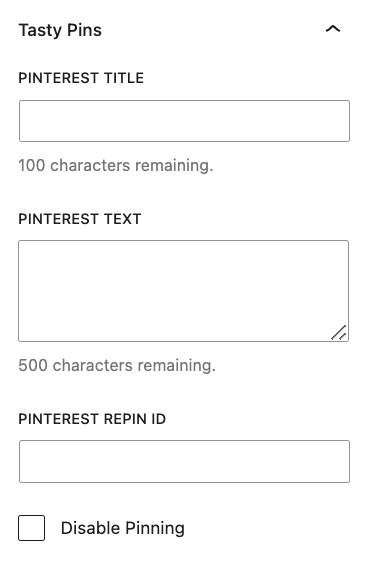
You can even upload “hidden pins” that are perfect for Pinterest but don't show up on your blog. Just enter your pin details in the Tasty Pins box, and it does the rest!
You also need to create beautiful, vertical images for your Pins.
Your Pinterest images and overlay text need to be relevant to your content. Remember, bright colors and interesting angles go a long way! Just check out WP Tasty's beautiful Pinterest images. 🖼️
Here's a final tip for pinning your way to success.
You need to pin fresh content consistently. Pinterest loves to see active users. So, the more you pin, the more likely your content is to get seen by a wider audience.
However, don't spam Pin. Try to avoid pinning to the same article more than once a week.
5. Turn your blog images into pins
Making your blog images “pinnable” is a key part of knowing how to use Pinterest for blogging.
It nudges your readers to share your content with their followers. That has the power to expand your reach and bring new visitors to your corner of the internet. It also signals to Pinterest that your content is valuable.
So, how do you make your content extra pinnable?
You could use code, but who has time for that? Tasty Pins is a must-have WordPress Pinterest plugin for this! It makes your blog images “pinnable” by automatically adding hidden Pinterest descriptions and eye-catching “Pin It” buttons to your images.
When a reader hovers over an image, the button pops up. This way, it's simpler for them to repin your blog post to their own Pinterest boards. Watch the video for more on how it works ⬇️
With Tasty Pins, you can also:
- Disable pinning: You can turn off pinning for specific images in WordPress.
- Choose your pinnable images: Decide which images you want to be pinnable and which ones you'd rather keep hidden. This ensures that only your best, most Pinterest-worthy images get shared.
- Customize your pin it button: Choose from a variety of button styles and colors to match your blog's aesthetic. Even include a call to action!
It does so much, doesn't it? That's why it's one of the best WordPress social media plugins. The best for Pinterest.
Tasty Pins starts at $49.00 per year for one website. Want to grab Tasty Pins for more than one site? No problem — there are plans for that, too!
7. Take advantage of Pinterest analytics for your blog's success
Understanding Pinterest's analytics gives you an extra edge when it comes to knowing how to use Pinterest for blogging.
It's a tool within Pinterest that shows how your pins are doing. Pretty cool, right? With this info, you have a better idea of what's working and what isn't when it comes to your blog and Pinterest.
With it, you can understand what content resonates with people and make more of it!
How to access Pinterest analytics
Accessing Pinterest Analytics is as easy as pie.
Here's how:
- Log into your Pinterest business account.
- Click your Pinterest menu in the top left corner
- Hit Analytics Overview in the top left corner of your Pinterest home screen.
Breaking down Pinterest analytics

Now, let's break down what you see in Pinterest Analytics:
- Impressions: This shows the number of times your Pin was on screen.
- Engagements: The total number of saves, Pin clicks, outbound link clicks, and more.
- Outbound clicks: The number of times an action took the user off Pinterest.
- Saves: You'll see how many people saved your Pin to their boards here. Getting more saves on Pinterest is an excellent sign that your content is valuable.
- Total audience: Total number of people who have seen or engaged with your Pins.
- Engaged audience: Number of people who have engaged with your Pins.
Using these metrics, you can figure out which Pins and what type of content is most successful.
How to Use the Data
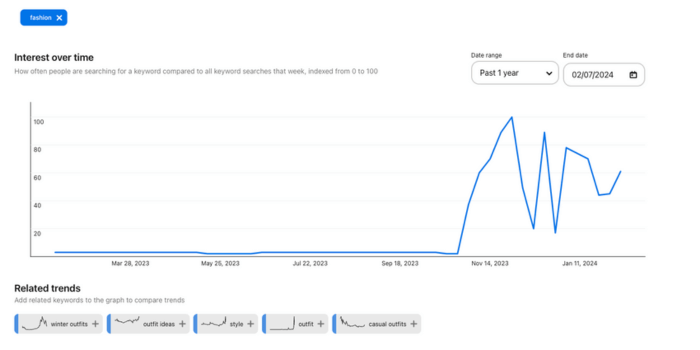
So, how do you use this data to your advantage? Here's what you can do:
- Find your top-performing pins and see what they have in common. Is it the image? The headline? Use this insight to create more Pins that share these successful elements.
- Check when your audience is most active and schedule your Pins to go live during these times. Do you have spooky Halloween recipes to share? People usually look for those a month or two early!
- Keep an eye on trends: What's hot and what's not? Pinterest Analytics shows trending topics and keywords in your niche. By creating content around these trending topics, you can capitalize on current interests and attract a wider audience.
A goldmine of data is waiting for you in Pinterest Analytics. And each piece of information is a tip for how to use Pinterest for blogging.
So go ahead, rock those analytics, and watch your blog blossom!
7. Try out the best resources and tools for growing your blog with Pinterest
Here are the top resources and tools I recommend to grow your blog traffic through Pinterest:
Rich Pins with Tasty Recipes
You need to get familiar with Rich Pins.
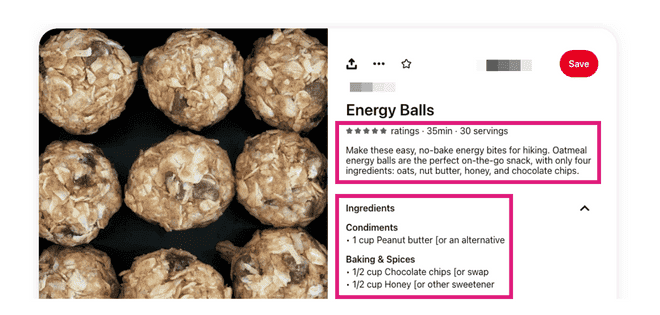
These are Pinterest pins that show more info than regular pins. They can show the title of your blog post, the author, and even a brief description.
Pretty cool, huh?
And if you're a food blogger, it gets even cooler. Tasty Recipes is a must-have WordPress recipe plugin that makes your recipes look amazing on Pinterest with rich snippets that include your recipe title, cooking time, ratings, and more!
Canva
Now, let's discuss image creation.
Ever heard of Canva? It's an excellent tool for creating eye-catching pin cover images and improving your Pinterest marketing. With Canva, creating beautiful and engaging pins is super easy, even if you're not a graphic designer.
Tailwind
Finally, let's talk about Tailwind.
This is a Pinterest-approved scheduling tool. It allows you to schedule pins at the best times for engagement and even provides analytics.
So, there you have it. These are some of the best resources and tools to make Pinterest work for your blog.
Start exploring them and watch your blog grow!
Frequently asked questions about using Pinterest for blogging
Got questions about using Pinterest for blogging?
I have answers!
Here are some of the most common questions from bloggers like you who are new to using Pinterest for blogging.
1. What should I pin?
Pin anything and everything related to your blog!
This can be blog posts, products, infographics, or inspiring images. Don't forget, the goal is to provide valuable content that's visually appealing.
So, keep it relevant and make it pop!
2. How often should I pin?
There's no set-in-stone rule. Most experts recommend pinning at least once a day.
Consistency is key here. You want to stay active and relevant, so a steady stream of pins can help boost your visibility.
Interested in Tasty Pins?
Make Pinterest easy with Tasty Pins! Automatically optimize your blog images for Pinterest and control your pin titles and descriptions for more clicks.
Don’t forget about our 14-day money-back guarantee! Trying out Tasty Pins is risk-free!
3. How do I use hashtags on Pinterest?
Pinterest hashtags work similarly to other social media platforms.
You can use them in your pin descriptions to help Pinterest users find your content. However, they aren't really necessary. There isn't much evidence showing whether having them or not significantly helps or hurts your Pinterest standings.
If you do use them, don't go overboard. Go with relevant, specific hashtags instead of vague or overly broad ones.
4. Can I schedule pins?
Yes, you absolutely can schedule pins!
Using tools like Tailwind, you can schedule pins in advance. This is a time-saver and ensures you're consistently pinning, even when busy with other things.
Go use Pinterest for blogging!
That's a wrap on Pinterest for blogging!
You have the tools and knowledge to use Pinterest to grow your blog.
Remember, it's all about:
- Setting up your Pinterest business account
- Creating high-quality, pin-worthy content
- Optimizing your pins with keywords and eye-catching visuals
- Promoting your pins and engaging with the Pinterest community
- Analyzing your results to see what's working (and what's not)
The next step? Start pinning! But don't stop there.
Keep learning, experimenting, and refining your Pinterest strategy. The more you use the platform, the better you'll get at bringing your ideal audience to your blog.
Hungry for more Pinterest tips and tricks?
Don't forget to check out the WP Tasty blog and YouTube channel for even more content!
So go ahead, take the plunge, and use Pinterest for blogging! Your audience is waiting to discover your amazing content.


