If you’re new to Pinterest, figuring out how to create a Pin and add it to Pinterest can be tricky. Picking the right picture AND writing a good description…it’s easy to get stuck.
So, in this guide, I’ll show you, step by step, how to make and add Pins to Pinterest. 📌
By the end, you’ll be confidently creating Pins that bring more eyes (and traffic) to your blog.
How to create a Pin on Pinterest
Creating a Pin on Pinterest is pretty simple whether you're on your computer or using your phone. Just follow my lead!
On a side (but important) note: The next few steps assume you already have a Pinterest account. If you don't, I recommend signing up for or switching to a Pinterest business account for your website or blog.
Discover Our Top 5 Tips for Optimizing your Pinterest Account
Sign Up1. Log in to Pinterest

Head to Pinterest on your desktop or open the Pinterest app on your phone. Then, log in with your username and password.
2. Create a new Pin

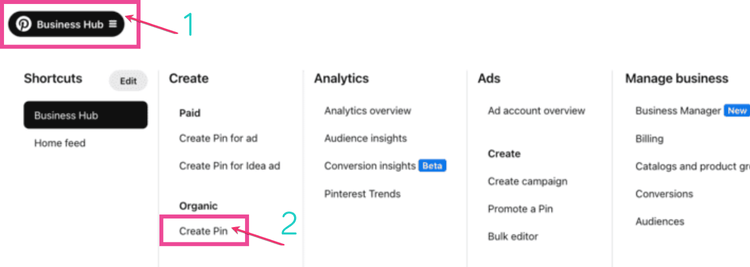
Look for the Plus (+) sign on your profile. Or, click the Pinterest business menu in the top left corner > Organic. Then select Create Pin.
*An organic Pin is sometimes called an Idea Pin.*
3. Upload your image

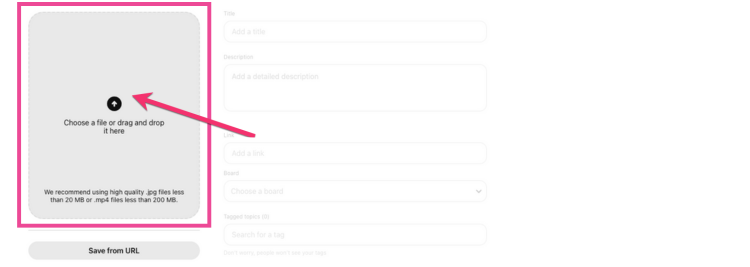
Click to add an image to Pinterest. You can also drag and drop images and videos you want to add to your Pin.
Select a clear, attention-grabbing image. After it uploads, you can add a text overlay. You can also do this beforehand if you're creating your whole Pin before uploading.
Just make sure your image and text overlay are related to your Pin’s topic.
⭐️ Need tips for creating eye-catching Pinterest images? Check out my guide for high-performing Pinterest images to make sure your Pins stand out!
4. Add a title and description, plus a link to your content

Write a short, catchy title that tells people what your Pin is about.
In the description, use a few keywords that describe your Pin. This helps people find it when they’re searching on Pinterest.
🔗 Don't forget to add a link (destination link) to your website or blog. That way, people can click through to learn more about your content.
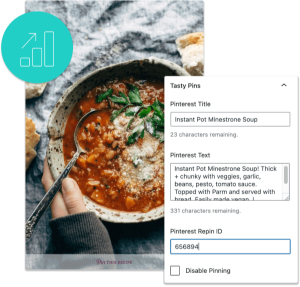
Psst, bloggers! 💻 Want to add the perfect Pin titles and descriptions to your images right from WordPress? Tasty Pins makes it super easy to do just that, so your shared Pins are always on point!
5. Choose a Pinterest board and tags
Time to get organized! Pick the Pinterest board where you want to save your Pin. That way, it’s easy to find later.
Try grouping your Pins into related topics so that it's easier for people to find what they’re looking for.
For example, if you're sharing a Pin about travel in Ireland, you might choose a board like Ireland Travel. If you don't have a related board yet, just create a board!

Don’t forget to add a few relevant tags (like Ireland Travel Guide or Ireland Destinations) that match your Pin’s topic. Tags help your Pin pop up in searches, so pick ones that make sense for your content.
If your Pin is about a certain product, you can also tag the product directly on the Pin.
This makes it easier for people to find and even shop your recommended products! Just make sure that if they're affiliate links, you disclose them.
6. Publish your Pin to Pinterest
Once you’re happy with your Pin, click Publish, and you're done!
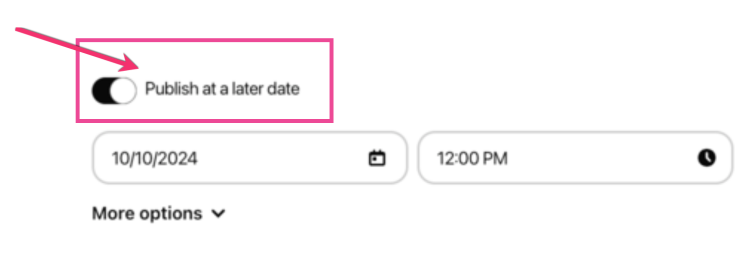
If you don't want to publish your new Pin to Pinterest immediately, you can schedule it to post later!

Just toggle on the button that says, Publish at a later date. Then, choose your date and time, and it'll automatically publish the time you set.
How to post stuff on Pinterest from your blog
You can make sure your images are ready for sharing with a little help from a WordPress Pinterest plugin.
1. Use Tasty Pins to optimize your images
Let’s say you used Canva to create a Pinterest image for your blog post about the best places to visit in Dublin.
Well, Pinterest images work best when they’re tall and vertical, but that’s not always the best size for your blog. But, with Tasty Pins, you can add that Pinterest-sized image as a hidden image on your blog.

You just add it to your Tasty Pins section at the bottom of your screen in your WordPress blog post. Then, check the box that says ✅ Force pinning of hidden images.
This means when someone clicks the “Save to Pinterest” button on your Ireland travel image, they’ll Pin the tall, Pinterest-perfect version!
2. Encourage readers to share your Pin
You’ve set up your blog images for Pinterest, but now you need to make it super easy for your readers to share them! That’s where the customizable Pinterest button from Tasty Pins comes in.
To see how easy it is to set up, check out our quick YouTube tutorial on how to do it. 🎥
You can also add a Pinterest banner to your first image. Then, style your save button to say something like, “Pin this!” to let your readers know your images are ready for Pinterest.
The easier you make it for them, the more likely they’ll share your content!
3. Install the Pinterest browser button (Optional)
If you or your readers want to create a Pin straight from the web, using the Pinterest browser button is an easy way to do it.
Just click the button to save images from any website directly to your Pinterest boards.
💡 Keep in mind: this might not be the best option if you’re focused on Pinterest aesthetics since you have less control over selecting the saved images.
Using a WordPress Pinterest plugin like Tasty Pins lets you control the EXACT image and description that gets pinned, making sure your content always looks its best.

Interested in Tasty Pins?
Make Pinterest easy with Tasty Pins! Automatically optimize your blog images for Pinterest and control your pin titles and descriptions for more clicks.
Don’t forget about our 14-day money-back guarantee! Trying out Tasty Pins is risk-free!
Create a Pin on Pinterest, and take the next steps!
And that’s it! Now you know how to create Pins right in Pinterest.
From picking the right picture to adding a good description, you’ve got everything you need to start pinning with confidence.
Don’t be afraid to try different kinds of Pins! The more you Pin, the better you’ll get at making Pins that bring more people to your blog.
🎓 Want to learn more about Pinterest marketing? Join the Pinterest Academy to get easy tips sent right to your inbox!
Discover Our Top 5 Tips for Optimizing your Pinterest Account
Sign UpAnd before you go, here are a few more articles to help you grow your Pinterest skills. ⬇️
- Find the right Pinterest keywords to help your Pins get discovered
- Prime your Pins for more views and clicks with my Pinterest SEO tips
- Focus on food and learn How to Pin a Recipe to Pinterest

