
One of the most crucial factors for success on Pinterest? Fresh pins that deliver fresh content.
But what exactly is a fresh pin, and why does Pinterest now favor fresh content over duplicate pins?
I get it. Pinterest gets overwhelming with all its terms — fresh pins, idea pins, carousels. What do they all mean, and how do you balance creating fresh content with reusing what you already have?
In this guide, I’ll break down what counts as a fresh pin, why it’s essential for your Pinterest strategy, and share actionable steps to create fresh pins that drive traffic to your website.
What counts as a fresh pin on Pinterest?
A fresh pin is a new image or video shared on Pinterest for the first time. It has a new title, description, or alt text. Even if it links to an old blog post, a new design makes it fresh.
Pinterest favors fresh pins because they keep things exciting. So, to get noticed, try making new designs and writing fresh descriptions for each post.
Have a blog post about a chocolate cake recipe? Create one pin with a slice of the cake and another showing the full cake or even quick steps!

Then, you could write different text overlays for each, like “The best chocolate cake ever!” or “Try this easy chocolate cake recipe.”
This way, you’re giving Pinterest and your audience more variety. In turn, keeping them interested and boosting the chances of your pins getting shared.
And here’s an extra tasty tip: When you update an old blog post, make a new pin for it! If you’ve changed pictures, added ideas, or included an affiliate link, a fresh pin might bring people to your blog.
Discover Our Top 5 Tips for Optimizing your Pinterest Account
Sign UpWhy fresh pins matter for your marketing strategy
Creating fresh pins isn’t just a trend — it’s a must for bloggers and businesses who want to grow.
For you, this means making fresh pins is one of the best ways to get your blog or business noticed.
When you share fresh pins, you:
- Get seen by more people in Pinterest searches.
- Reach new audiences who haven’t seen your old pins.
- Keep your followers interested with new ideas to click on and share.
Think of Pinterest as a search engine for pictures and videos. It rewards fresh ideas! Whether it’s a new recipe, an updated blog post, or a creative way to share an affiliate link, fresh pins on Pinterest help you stand out.
Let’s stick with our chocolate cake example! 🧁
You could make a fresh pin for Valentine’s Day with hearts and a love-themed description. Then, make another pin for Halloween with spooky decorations. These seasonal pins let you share the same recipe in fun, new ways all year long.
The more fresh pins you share, the more Pinterest shows them to people. It also keeps your followers excited and coming back for more.
How to create fresh pins on Pinterest
Creating fresh pins doesn’t have to be hard! I'll show you how to do it step by step:
1. Plan your content
Every fresh pin starts with a strong piece of content. This could be:
- A new blog post showcasing a recipe, tutorial, or story.
- An affiliate link for a product you love.
- Fresh content like videos or infographics to grab attention.
Planning helps you focus on what your audience will love. Decide what you want to promote, then think about the best way to show it. Will an image stand out, or will a video stand out more?
You know that chocolate cake recipe! Want to make it perfect for Valentine’s Day? Plan a themed pin with hearts and a super sweet title, like “The Best Chocolate Cake for Your Valentine!”

And here’s an extra tip: Use keywords to help your pins get found. My easy guide will show you exactly how to find the best keywords for your pins!
2. Create your Pinterest fresh pin
Planned your content? Great! it’s time to create your pin!
You can use a variety of tools to design fresh, eye-catching pins. Here are a few of my favorites. ⬇️
Pinterest makes it easy to create individual pins right on their platform.
Already have a Pinterest business account? Then, it’s as easy as logging in and creating a new pin.
Start by uploading your pin image or video. You can create this in Canva or use a plain image and add overlay text directly on Pinterest. Next, fill in your pin details, like a title, description, and the URL it links to. Once everything is ready, just hit publish!

Want a more in-depth walkthrough? Use my step-by-step guide for creating pins on Pinterest. It’s a great place to start, especially if you’re new to pin creation.
Canva

I use Canva to create beautiful pins quickly and easily.
It has loads of templates, so you don’t have to start from scratch. Just pick a template, add your own text and colors, and you’re ready to go.
For example, if you’re making a fresh pin for your chocolate cake recipe, use one design with hearts for Valentine’s Day. Then, try another with orange and black for Halloween.
When your pin is ready, download it and upload it to Pinterest. Canva lets you upload directly to Pinterest too, but you can’t add as many details this way, like rich descriptions or alt text. It’s better to design in Canva and upload your pin manually on Pinterest.
You can also resize your Canva designs for other platforms, like Instagram or Facebook. So, it's a handy tool for all your designs!
Tailwind

If you’re using Tailwind, their “Create” feature is a time-saver.
It helps create multiple pins in minutes. You can quickly try out different looks for your content and keep your Pinterest strategy fresh.
3. Write a solid pin title AND pin description
Your pin title and description are just as important as the image itself.
They help people find your pin on Pinterest and get them to click over to the next place — your website (or wherever else you're sending them). Think about what someone might search for and add those keywords to your title.
Pinterest title
A good title is clear, short, and tells people what your pin is about.
For example: “The Best Chocolate Cake Recipe for Valentine’s Day”
Not sure how to use keywords effectively or without being spammy? Use my guide on where to put keywords on Pinterest.
Pinterest description
Your description should tell people why they should click your pin.
Make it fun, easy to read, and include a call to action.
Here's an example to match our title: “Make this rich chocolate cake for your special someone. It’s easy to bake, making it a perfect Valentine’s Day recipe. Click to get the full recipe!”
✨ Need more tips or inspiration? This guide on Pinterest titles and descriptions has everything you need.
Set Pinterest descriptions from your blog
Using WordPress for your blog?
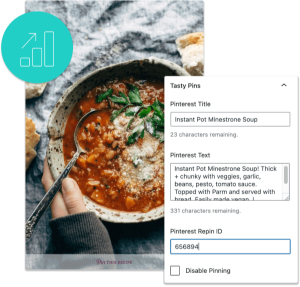
Well, a WordPress Pinterest plugin like Tasty Pins makes it easy to set Pinterest descriptions straight from WordPress. But why is this helpful? Well, It saves time and makes sure every pin shared from your blog has the best title and description to do well on Pinterest.

With Tasty Pins, you can write Pinterest-specific descriptions right in your WordPress editor.
This means you don’t have to guess or hope others write good descriptions when they pin your content. It’s already done for them! (Yes, it’s that easy!)
4. Post your fresh Pinterest pin to a relevant boards
Once your fresh pin is ready, the next step is sharing it to the right boards.
Why does this matter? Posting to relevant boards helps your pin get seen by pinners who care about your content.
So, think about your pin’s topic and where it fits best.
Here are a couple of examples:
- A chocolate cake pin for Valentine’s Day? Share it to “Valentine’s Desserts” or “Best Cake Recipes.”
- A weeknight dinner pin? Post it to “Quick and Easy Meals” or “Family Dinners.”
Oh, and don't be afraid to pin to multiple boards. 📌
Your chocolate cake pin could also go to “Chocolate Lovers” or “Holiday Baking Ideas.” Just make sure every board is truly relevant. And, try not to overdo it.

How often should you post fresh pins on Pinterest?
Consistency is key! There’s no perfect number when it comes to posting the number of fresh pins per day. But it’s important to stick with a schedule you can keep up with.
Maybe you can only create 1–2 fresh pins per week. That’s OK! It’s better to post regularly than to try too much and burn out. It’s always better to trickle out one pin per week than to “binge post, then ghost.” 👻
Using a content calendar, like the one in Tailwind helps to keep you organized and consistent. You can also use Tailwind for scheduling your pins.

Other Pinterest experts, like the crew at Simple Pin Media, suggest posting 1–3 fresh pins each week and repinning older pins when the time is right.
Repinning works best if the pin fits a season, a trend, or a newly relevant board.
All in all, focus on quality, not quantity. A few great pins are better than a lot of sloppy rushed ones. So, stick with a plan you can manage!
Mistakes to avoid with fresh pins on Pinterest
As a content creator, your plate is full! 🍛 So full that even experienced pinners can make mistakes with fresh pins.
Here are some common ones to watch out for:
- Overusing templates: Using the same design too often can make pins look boring or get flagged as duplicates. Switch things up!
- Skipping metadata: Always add a pin description and alt text to help people find your pins.
- Pinning to irrelevant Boards: Only share pins to boards that match your topic.
By avoiding these mistakes, you'll create pins that will stand out and perform their best on Pinterest.
Go create fresh pins for your content!
Creating fresh pins on Pinterest doesn’t have to be complicated, but it can make a big difference.
They make your content exciting and help it stand out. Plus, they keep your audience engaged and might even help your next pin go viral! Whether it’s a recipe, a blog post, or a YouTube video, fresh pins are a big factor when growing your blog with Pinterest.
Want to make it even easier?
Tools like Tasty Pins help you connect Pinterest to WordPress. With it, you can set descriptions, add alt text, and add a Pinterest save button to your blog.
Now, over to you. 🫵🏻 If you haven't yet, learn how to connect Pinterest to WordPress and start creating fresh pins today! Your next viral pin could be just a click away! 🖱️
Interested in Tasty Pins?
Make Pinterest easy with Tasty Pins! Automatically optimize your blog images for Pinterest and control your pin titles and descriptions for more clicks.
Don’t forget about our 14-day money-back guarantee! Trying out Tasty Pins is risk-free!
